Sunday, September 15, 2013

Birchbox: September 2013


Here's what I got in my September Birchbox:


Serge Normant Meta Luxe Hair Spray

Jouer Moisturizing Lip Gloss in Monaco

Borracha Wine Wipes

Juice Beauty Green Apple Peel Sensitive Strength

Ruffian Nail Lacquer in Fox Hunt

I wasn't too pleased with this month's stuff and here's why:

I don't tend to use hair spray on my hair. So that knocks down one major product. Wine wipes...though a nifty product design in itself; but I don't drink wine. This also wasn't the first time I've gotten a similarly colored nail polish/lip gloss and I would have preferred a wider variety in color. Lastly, the Apple Peel, I haven't tried that, so we'll see about that product!

NYX Blushes

NYX is a company who's products that I absolutely adore. Not only are their products great in general, but they have a wide selection in color variety and their prices are very affordable.

Today's post will be about their blushes. I have mostly their powder blushes with a few of their cream blushes. Let's get started...for reference, my skintone is NC25.

Here's the whole picture. I have the powders on top (the squares) and also a mosaic powder blush on the bottom right corner.


 Let's break it down and review the powders first:


 Swatched in the same order:

Amber, Cinnamon, Pinched and Terra Cotta will be my go to colors for Fall. Cinnamon is a great burnt orange color (it looks bright in the pan, but as you can see, swatched, it's not so rough). Terra Cotta is a color that I will use to layer blush colors with. I will use it as a highlight on top of blush. Finally, one of the most talked about blushes: Taupe. This is a great contour color for those that are NC25 or lighter. If you are darker than NC25, this is not probably not for you (in my opinion) as it will probably not show up on you very well. Taupe is matte, so it's wonderful to contour with.


Cream Blushes:


Swatched below:

First off, let me just say, these are ONE swipe swatches. The colors are amazing. Pigmentation is out of the world on these. The best way to use these cream blushes is with a stippling blush. I can't imagine using my fingers applying this because I can't control how I apply it with my finger.

I will be using more of these cream blushes in the colder weather. I didn't use much of these cream blushes in the summer because I'm not a huge fan of too much cream on my face during the summer (I have combo skin and very oily t-zone), so I try to stay away from creams as it slides off  my face.

Cream blushes don't last as long on me as powder blushes. I noticed these NYX cream blushes had the same affect as well. To make them last longer, I will layer the blushes. I will put the cream blush on first (with the stippling blush) and then powder my face (set it) and then I will find the matching blush color (powder) and top it off and it will last ALL day/night.


NYX products can be found at NYX Cosmetics Ulta, Cherry Culture, Target

Saturday, September 14, 2013

Mac Paint Pots vs Maybelline Color Tattoos

This is a comparison post about the texture and wear of the Mac Paint Pots vs Maybelline Color Tattoos. Also, I have a dupe!

Read on...

Here are some pictures of the paint points I have. I already made a separate post of Mac Soft Ochre paint point. It's a long loved basic paint pot for those that are NC skin toned (if you are more cooler in skintone, Mac Painterly is your best bet for a base). That post can be found here: Mac Soft Ochre

Ok, so I bought NEW Mac paint pots that just came out in their Pro Longwear line recently. All Paint Pots are $20 each:


Tailor Grey is a simple taupe-y grey and Constructivist is a gorgeous shimmery brown. When I say shimmery, it's not a overwhelming shimmer. Since I just got these, I have no problems with creasing with using these and they last all day. I will be using Tailor Grey as a base for dark/fall smokey eye looks.

Now, let's get to the Maybelline Color Tattoos:


I have 6 colors. There aren't many matte shades in this line. Tough as Taupe is the only one I have that's matte (it may be the only matte one in the line). 

Let's compare the two:

Price:

Paint Pots (PP) are $20 each and Color Tattoos (CT) are usually Buy 1 get 1 50% off here in the U.S. at the drugstores. 1 CT usually runs around $5.99-$7.99 depending on where you get it.

Colors:

PP has a TON more options than the CT. Not only does the PP have a wider color selection, but it also carries a better range (more mattes, more brighter colors).

Staying Power:

I'll preface by saying I do not give in the hype of brands that market their product with things like "24hrs"...because let's be serious here, I DO NOT wear my makeup for 24 hours straight. I will say this, both PP and CT lasts all day. However, CT has creased on me if I wear it by itself, whereas, the PP has not creased on me worn alone. Neither creased if worn as a base.

Color Pay-Off:

PP has a better color pay-off than the CT. Hands down. The lighter colors in the CT line are so sheer (this may also be the reason why it creases on my lids easier). A single swipe of PP has a better pay off than a single swipe of CT.

Lasting Over Time:

I've read the stories of people having issues of their paint pots drying. I cannot give a fair comparison because I haven't had my paint pots long. I've had Soft Ochre for about a month and it's still perfectly fine. I've had some of my CT for about a year and it's perfectly fine. I believe that if you keep them sealed properly and keep good care of your makeup, it shouldn't be an issue. I store my makeup in it's separately makeup room (you can see my post here of my Makeup Room) so I think that helps.

Overall:

I think overall, if you're thinking about the price, you could technically get THREE CTs for the price  of 1 PP, however, a lot of makeup and like, many other things, it's about quality, not quantity! I definitely suggest a couple of good colors from CT (Tough as Taupe is a favorite and Barely Branded is a nice creamy with a light shimmer as well). 

Dupe Alert:

As I promised, I did find a good dupe. One of Mac's new Pro Longwear PP (Tailor Grey) and one of my favorite CT (Tough as Taupe) is pretty close in color:


I hope this post was helpful!

Friday, September 13, 2013

UD Vice 2: Part 2

Swatches and FOTD:

 First Row: Smokeout, Lovesick, Shellshock, Coax, X-rated

I am LOVING Shellshock. It is the most gorgeous shadow I've touched. It looks almost wet and it has the most beautiful color on my NC 25 skintone. Smokeout, the matte black is of course a great color to have in general!
 Second Row: Prank, Madness, Strike, Stash, Poison

Stash is a color that stands out for me in this row. It's a great shimmery olive color. Madness is also a gorgeous, vibrant blue.
 Third Row: Radar, Damaged, Voodoo, Betrayal, Derailed

Radar is wonderful. It's a great coppery/gold color in this collection. Voodoo is gorgeous violet, perfect for my kind of deep smokey purple (for fall). Derailed is great too in a collection. I'm not loving Betrayal though, especially not next to such a vibrant color like Voodoo. It's missing a punch or two.
Fourth Row: Dope, Toxic, Habit, Ambush, Rewind

This last row is your basics. Dope is great for a brow highlight. Toxic is a great rose gold color. Habit is a nice cream base to set your lids. Rewind, well, you can see below, I can use rewind to fill my brows! 

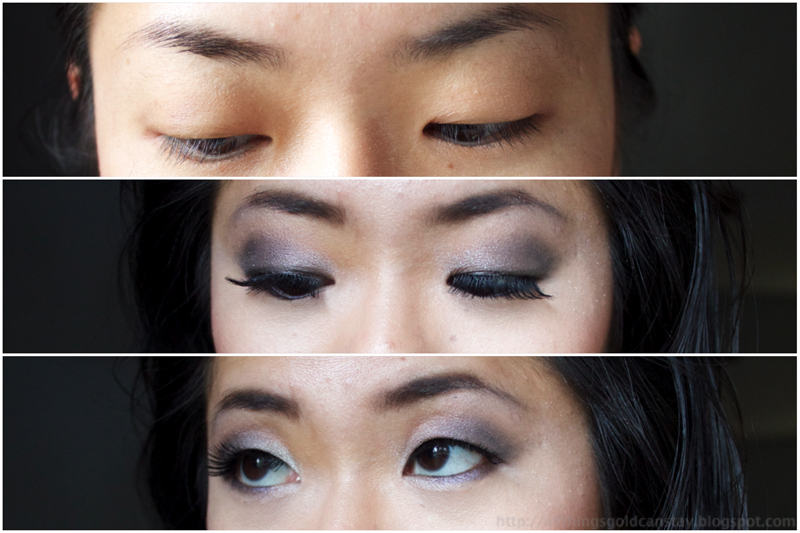
 Here's my FOTD (photo of the day)

The first picture is the before of course...product list below:

I achieved this eye look using the Vice 2 palette:

I primed my eyes with Urban Decay Primer Potion
I then filled my brows using Rewind eyeshadow
I used Habit as a base all over my lids
Then dusted Shellshock on the inner 1/3 of the lid
I then used Voodoo on the outer 2/3 of my lids and blended out
I then took Poison with a flat blush and use just a little bit in the outer corner (outer v) and blended out
Finally, I used Smokeout with a liner brush and softly lined my top and bottom lash line
I also went over my bottom lash line with the Voodoo color as well
To finish off. I popped on some false lashes!

So what do I think of this? It's a great palette. Is it worth the $59? I don't know....I have a LOT of palettes. What makes this palette so much better than Naked, Naked 2, Lorac Pro? Why is it more expensive? I think it could use a bit more mattes. I do love that it gives much more color options (especially compared to Naked, Naked 2). Will it be a MUST HAVE like the first Vice? Probably...So yes, grab it up if you are a fan of Urban Decay shadows. These are HIGHLY pigmented and the colors are very versatile. If you ever complained that the Naked and Naked 2 just don't offer enough color options, now it's your chance to grab something different!

You can find this product at:

Urban Decay and Sephora for $59

I give this product a 8.5/10

Thursday, September 12, 2013

Urban Decay Vice 2

It's here...the Urban Decay Vice 2

Here are some pictures and first impressions...a more intensive swatch and review to come:


Colors are vibrant and gorgeous! The overall package was a lot smaller than I thought (which was a good thing because I thought it was going to be bulky and big. I never got my hands on the first UD Vice palette, so I am not sure how that compared). I cannot wait to try it out! Everything came packaged nicely and no shadows were cracked!

Monday, September 2, 2013

[TUTORIAL TIME] Face and Eyes

Ever wondered what it takes to achieve a flawless face? Or at least, semi flawless?

Below is a before and after of me. No touch-up, no photoshops, no lighting tricks. Just the camera, me, and a before and after shot with and without makeup.

BEFORE AND AFTER:


PRODUCTS USED:


It's crazy seeing all the products laid out to see what it takes to make a full face. Everything here is what I used on my face. This is a complete full face. Please note this picture does NOT includes the Lorac Pro palette for eyes and it also does not include brushes used. Let's name the products. I'll name them in the order of how I used it. For reference, I have combo skin (normal face, oily T-Zone) and I am NC25:

1. Benefit Stay Flawless 15-Hour Primer (used as a primer all over my face)
2. Mac Prep +  Prime BB Creme in Light Plus (all over face as my face coverage...I use either BB creams or foundations or powders)
3. L'oreal True Match Concealer in Light/Medium (all over my chin and the sides of my nose)
4. Covergirl & Olay Eye Concealer in 205 (under my eye)

Steps 1-4 is a base, once these steps are done, I can then add color to my skin...moving on:

5. Chanel Soleil Tan De Chanel Bronzer (I add this to bronze my temples, and where the sun hits)
6. The Balm's Mary-Lou Manizer (I use this above my cheekbone as a highlighter)
7. Sonia Kashuk's Blush in Sunset (I add this to the outer apples of my cheek)
8. Mac Mineralize Skinfinish Natural in Medium (I dust this finish powder all over after to set everything)
9. YSL Sheer Candy in #9 Cool Guava (2 coats)

Steps 5-9 finishes adding color to my face. Now, most people will do their eyes before their foundation, which is what I normally do, but since I was trying to do a close up of eye tutorial as well, I wanted to get the face done first. Either way is fine, but if your eye makeup has a lot of fallout, it's easier to do eye makeup first. Let's move on to eyes and finish everything off!

Eyes: I have downward turned monolid eyes. Obviously, this is pretty rare in the U.S. (where I live). So below is a step-by-step guide of how I usually do my eyes:


BRUSHES:

Just as important in applications and products are also the tools that you use. Below are the tools I used in today's makeup look (I realized afterwards that I forgot to include the eyelash curler). Let's go into detail to what each brush is used for:


1. Real Techniques (RT) Duo-Fiber Eye Brush: This was my blending brush. Once I packed on a color, I used this brush to blend out the color on my eyes.
2. e.l.f Small Angled Brush: I used this for 2 things, filling in my brows and also to line my liner in Black eyeshadow.
3. RT Stippling Brush: I used this brush to put on my cream bronzer.
4. Sonia Kashuk No. 106 Brush: I used this to pack my eyeshadow on the creases and corners on
5. RT Blush Brush: I used this to put my blush on.
6. RT Duo-Fiber Contour Brush: I used this to put on highlighter.
7. RT Powder Brush: I dust an all over powder on my face.
8. RT Contour Brush: I use this to dust powder under my eyes (it's a smaller brush).

I hope this was helpful! Let me know what other tutorials you might be interested in!

Saturday, August 31, 2013

[TUTORIAL TIME] D.I.Y. Eyebrows

Let's get down to business, and defeat these brows!

First, let me just say, I had to grow mine out for a good 2.5 weeks to be able to do this tutorial. I hope you guys really enjoy this! I will say one thing, I do NOT use scissors. I have not ever trimmed my own brows before. I'm not THAT confident in myself yet. I have, however, used those mini razors on my brows. Let me tell you, those are amazing! They are very easy to use and are fast!

I tend to do my own brows except for maybe once a year or twice a year where I'll go and get them threaded, but that's about it. By, 'do my own brows', I mean I just tweeze them.

Here's a quick tutorial I put together. Keep in mind, I've decided to give 3 options in terms of what to use to fill in your brows. Pencil, powder and gel.

Let's get started with the tools:


The highlighter crayon is used to sketch where you will be tweezing. You can use anything. I choose this particular crayon because it will also double as my brow highlighter.

The Color Tattoo, Mac shadow (in Brun) and the Sephora Brow Pencil are the 3 products we will use to fill our brows at the end. All the rest of the products you see are the tools we will use to prep our canvas.

Step 1:


I didn't actually mean dirty...I meant unkept..anyhow. If you google 'brow arch' you will find a billion and one search results for different shapes. First, I'd like to apologize for not including my nose (which is oh-so-important when measuring arches). Basically, you want to keep your arch natural. Don't try to change anything outrageous. If you at the left line, I clearly have a LOT of eyebrow hair to the left of that line. Does that mean I should tweeze all of that? NO! The lines are just a guide! However, if you look at the middle line, your highest arch, should align with you outside pupil and the outer nostril. Alright, enough staring at my unkept brow? Let's move along...

Step 2:


Sorry for the blurry picture. Alright, I've marked where I'd like to tweeze. Anything outside the line can be tweezed. Let's go!

Step 3:


MUCH BETTER! Now that you've tweezed everything outside the line, go ahead and clean everything up! After the crayon mark is wiped up, take a closer look. Use the spoolie and brush everything in place and see if you need to tweeze any additional stray hairs. This is also a good time to use the clear brow gel and stick everything in place and double check!

Step 4:


Time to fill it up! Take your favorite product and start filling your brow up! Remember to fill the outside first, then use the mascara spoolie and brush it in and step back and take a look. Don't overfill! Then if need be, fill the insides last. This is done with Mac's eyeshadow in Brun. My hair color is jet black for reference.

Below are some other ways of filling in your brows:


I hope you've enjoyed this tutorial! Let me know if there are any other tutorials you'd like to see!